리눅스에서 손쉽게 적용하는 방법입니다. 사용된 OS CentOS5점대 입니다.
특정서비스에 대해 오픈/차단 할수 있는 방법 입니다. 사용되는 포트외에는 모든 포트을 막으면
아무래도 해킹당할 우려가 조금은 줄여 줄 듯 합니다. 적용하시길 권고 합니다.
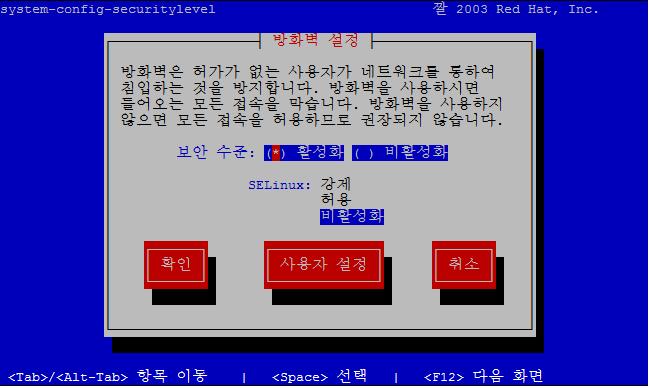
콘솔에세 setup을 칩니다.
방화벽설정-실행도구를 클릭합니다.
그러면 위 그림과 같은 방화벽 설정 화면이 나옵니다. 활성화 * 체크을 하고 사용자설정 클릭합니다.
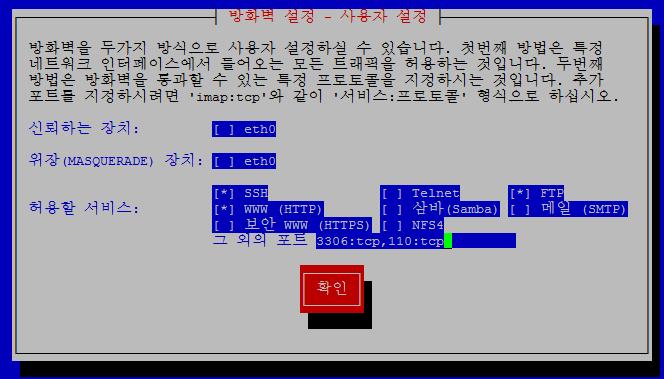
허용할 서비스에 원하는 서비스를 체크해 주시고 확인-확인 하시면 됩니다.
신뢰하는 장치에 체크되어 있으면 그 장치는 신뢰구간으로 인식되기 때문에 체크하지 마세요.
그외에 포트를 추가 하려면 서비스:프토토콜 하시면 됩니다. (/etc/services 파일 참조)
*사진은 포트번호:프로토콜로 적용했는데 올라오네요..
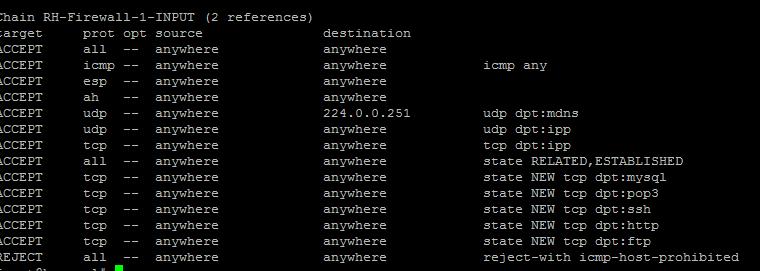
iptables -L 명령어로 확인해 보세요
CentOS4.7이 디폴트로 설치된 하드를 백업받기 위해 새로운 시스템(centos5)에
꽂고 마운트 시켰는데 마운트가 안되는 현상이 있습니다.
원인은 LVM볼륨으로 작성되어서 그렇더군요!!
FDISK 상에서도 확인가능합니다.
====================================================================
Device Boot Start End Blocks Id System
/dev/sdb1 * 1 13 104391 83 Linux
/dev/sdb2 14 2222 17743792+ 8e Linux LVM
=====================================================================
sdb1은 바로 마운트 가능하지만 LVM시스템은 마운트가 되지 않습니다.
아래 절차에 따라 하면 마운트 되네요...
pvdisplay /dev/sdb2 =>물리적 볼륨명 확인
--- Physical volume ---
PV Name /dev/sdb2
VG Name VolGroup00
PV Size 16.92 GB / not usable 15.92 MB
Allocatable yes
PE Size (KByte) 32768
Total PE 541
Free PE 1
Allocated PE 540
PV UUID 3oTLIk-mvTW-50qN-BTop-i5yY-32A1-a8wlWY
vgchange -a y VolGroup00 /물리적 볼륨그룹 액티브 시키기
2 logical volume(s) in volume group "VolGroup00" now active
lvdisplay -v VolGroup00 /로지칼 볼륨 확인 (2개가 있다.)
Using logical volume(s) on command line
Fixing up missing size (16.92 GB) for PV /dev/sdb2
--- Logical volume ---
LV Name /dev/VolGroup00/LogVol00
VG Name VolGroup00
LV UUID oFRCUd-Pzhp-L0YE-yLG1-Tgr8-SH38-lJ1ymJ
LV Write Access read/write
LV Status available
# open 0
LV Size 16.38 GB
Current LE 524
Segments 1
Allocation inherit
Read ahead sectors auto
- currently set to 256
Block device 253:0
--- Logical volume ---
LV Name /dev/VolGroup00/LogVol01
VG Name VolGroup00
LV UUID hDDcZ3-WjMx-0OPq-W3Kk-W1ue-pN9b-5ngyIV
LV Write Access read/write
LV Status available
# open 0
LV Size 512.00 MB
Current LE 16
Segments 1
Allocation inherit
Read ahead sectors auto
- currently set to 256
Block device 253:1
mount -t ext3 /dev/VolGroup00/LogVol00 /sdb
하면 sdb2파티셔이 /sdb로 마운트가 된다.
CentOS 5에서 Bind 불가
CentOS의 bind-9.3.3 버전에서는 named.conf와 같은 config 파일을 더이상 기본으로 설치해 주지 않는다.
이것은 버그가 아니라, 신중히 고려한 결과로 선택한 사항이다.
기본적으로 /usr/share/doc/bind-9.x.x/sample/etc 나 /usr/share/doc/bind-9.x.x/sample/var/ 에서 설정파일을 복사하여 사용하면 된다.
혹은 system-config-bind를 이용하여 설정할 수도 있다.
[root@ns root]# rpm -qa | grep bind
bind-9.3.3
bind-libs-9.3.3
bind-utils-9.3.3
[root@ns root]# rpm -qa | grep nameserver
caching-nameserver-9.3.3
이상의 패키지가 설치되어 있는지 확인한다.
caching-nameserver-9.3.3 패키지가 설치되어 있다면,
/etc/named.conf를 대신하여 /etc/named.caching-nameserver.conf가 BIND 설정파일이 된다.
별도의 설정을 사용하고자 한다면, /etc/named.conf을 만들어주면,
BIND 서비스 재시작시 자동으로 /etc/named.conf를 설정파일로 이용한다.
별다른 error 없이 서비스 할 수 있을 것이다.
bind-chroot 패키지를 설치하였다면, BIND 서비스는 /var/named/chroot 디렉토리를 통하여 실행된다.
또한 모든 설정파일도 /var/named/chroot 디렉토리로 이동될 것이다.
named.conf 설정 파일도 /etc 디렉토리에 위치하는 것이 아니라 /var/named/chroot/etc/ 디렉토리에 위치하게 된다.
-------------- 원문 ------------------
=============================================================
Bind is broken in CentOS 5
No, it's not. Yes, it looks like it, as bind-9.3.3 in CentOS doesn't install the config files anymore, at least not, where you would expect them. That was a deliberate choice by our upstream vendor. See this bugzilla entry.
Basically you can just copy the example files from /usr/share/doc/bind-9.x.x/sample/etc/ and /usr/share/doc/bind-9.x.x/sample/var/ to start your own configuration from.
Or you can use system-config-bind to set things up.
Documentation on bind can be found in the Deployment Guide, see Chapter 16.
Note
If you have installed the bind-chroot package, the BIND service will run in the /var/named/chroot environment. All configuration files will be moved there. As such, named.conf will be located in /var/named/chroot/etc/named.conf, and so on.
Tip
If you have installed the caching-nameserver package, the default configuration file is /etc/named.caching-nameserver.conf. To override this default configuration, you can create your own custom configuration file in /etc/named.conf. BIND will use the /etc/named.conf custom file instead of the default configuration file after you restart.
==================================================================
options {
listen-on port 53 { 127.0.0.1; };
listen-on port 53 { 서버IP; };
listen-on-v6 port 53 { ::1; };
directory "/var/named";
dump-file "/var/named/data/cache_dump.db";
statistics-file "/var/named/data/named_stats.txt";
memstatistics-file "/var/named/data/named_mem_stats.txt";
// Those options should be used carefully because they disable port
// randomization
query-source port 53; 주석제거
query-source-v6 port 53; 주석제거
allow-query { any; };
};
logging {
channel default_debug {
file "data/named.run";
severity dynamic;
};
};
view localhost_resolver {
// match-clients { localhost; }; 주석처리 안하면 외부통신
// match-destinations { localhost; }; 되지않음
recursion yes;
include "/etc/named.rfc1912.zones";
};